Preserving the Exterior Masonry on Your Historic Building

Madison, Wisconsin. Here is a photo of a common bond brick pattern with five courses of stretcher bond brick followed by a row of header course brick. Source: Photographer Mark Fay.
One of the most common building materials for older commercial buildings and homes in Wisconsin is masonry, or brickwork. Brick buildings are common because they were considered to be more durable and fireproof than wood buildings. In fact, by the late 19th century, many communities had mandated that their downtown buildings be made of masonry construction. The long-lasting properties of masonry allow these buildings to have a life expectancy of hundreds of years with proper care. By following a regular maintenance schedule and using proper preservation techniques, you can ensure your historic brick commercial building or house will last indefinitely.

Madison, Wisconsin. Here is a photo of a common bond brick pattern with five courses of stretcher bond brick followed by a row of header course brick. Source: Photographer Mark Fay
A Brief History of Brick Manufacturing
Brick buildings have been popular in many parts of Wisconsin since the time of early European settlement. Brick is a natural building material that was historically manufactured very near the place of construction. Thousands of brick manufacturers have existed in Wisconsin — from small, backyard operations during Wisconsin’s early days, to the large industrial manufacturers that arose later.
Bricks from ancient times up to the mid-19th century were simply slabs of clay baked in ovens. This process produces a brick with physical qualities similar to that of a loaf of bread – a very soft interior with a hard-baked crust. Clay shrinks as it bakes, and the early bricks did not shrink to a uniform size due to the uneven temperatures produced inside an oven. Bricks baked near the center of an oven tended to be harder and smaller than those at the outside of the oven. By the late 19th century, bricks were formed precisely by machines and molded with holes in the middle to ensure that the bricks were baked uniformly — the same principle used to cook donuts and bagels. Because these bricks were harder and more uniform, masons could lay them with thinner mortar joints using a harder mortar. The harder mortars were usually some type of Portland cement, which was much more rigid than the earlier mortar mixes.
By the early 20th century, masonry manufacturing techniques allowed for a wide variety of brick colors and textures. Brick buildings from this period often contain several colors as well as smooth, rough or glazed finishes. Brick buildings were often detailed with stone, terra cotta and other types of decorative surfaces. The large number of manufacturers in Wisconsin produced a wide variety of bricks in numerous colors, shapes, patterns, sizes, hardness and durability. This variety of masonry provides a richness of detail and a unique character to each historic downtown and residential area in the state. The color, texture, mortar joints and bond patterns of your house or building’s masonry all contribute to its historic character.
Historic Masonry Construction
Historic brick buildings were constructed to move and breathe. Masons anticipated that water would get into a brick building, so they employed construction techniques that would allow the water to exit. They used a soft, flexible and breathable lime-based mortar to serve these two purposes:
- To act as a separator bed between individual bricks, which allowed the wall and its individual components to move as the mortar expanded and contracted.
- To allow moisture to escape from the wall. Water follows the path of least resistance. If the mortar is softer than the bricks or stones in a wall, the water will wick its way out through the mortar joints, which keeps the interior of the wall relatively dry.
After constructing a building foundation, the masons would build exterior brick walls several courses (rows) thick. The most uniform and sound bricks were used on the exterior of a building. Bricks that contained flaws or irregularities were used on the interior walls and covered with plaster. Bricks were also used on cornices, pediments, lintels, sills and decorative features.
The masons laid the brick in different patterns of “headers” and “stretchers.” A header is the short end of a brick, and a stretcher is the long end of a brick. Two typical patterns for commercial buildings were five-course and six-course common bond, also called American bond. To make these patterns, the masons would lay five or six courses of stretcher bond brick followed by a row of header course brick, and so on.
Modern Masonry Construction
You should understand the important differences between historic and modern masonry construction techniques before you undertake any rehabilitation project on your historic brick house or building. If you use modern masonry techniques and mortar on your structure, it could spell the beginning of the end for your historic house or building. Modern masonry construction techniques resist brick and mortar movement and rely on a waterproof outer skin to prevent water penetration.
Modern masonry buildings are not made of load-bearing multi-Wythe construction. Instead, a face brick is applied to a rigid backing. Modern mortars act like a glue to hold bricks together. These “glued” bricks form a monolithic mass that is not meant to move like historic brick walls. Expansion joints are cut into these monolithic masses to limit and control the movement. The Portland cement in modern mortar is harder, more rigid and more waterproof than the original lime-based mortars.
Mortar Consistency

Madison, Wisconsin. This is an example of poor repointing - the mortar joints are not only wider than the original mortar joints, but the new mortar is also a different color. Poor repointing will adversely affect the overall appearance of the historic building. Source: Photographer Mark Fay.
Mortars are manufactured with materials of varying strengths, from soft lime to hard Portland cement. Prior to 1880, the mortars used in Wisconsin typically contained all lime and no Portland cement. Portland cement was first produced in the Lehigh Valley of Pennsylvania in 1871 and quickly began to supplement and later replace lime mortars. From about 1880 to World War II, most mortars contained both lime and Portland cement. By the second half of the 20th century, most bagged masonry cements contained Portland cement and sand with little or no lime.
If your historic house or building needs repointing, make certain the masonry expert you hire uses mortar that matches the strength of the original mortar. Hard mortar that is inserted in a structure with original soft mortar will cause spalling and breakage. If your building was constructed before the 1860s, the brick is very likely a soft brick with soft mortar. If your building was constructed after 1890, it was probably built with relatively hard brick and hard mortar.
Best Practices for Historic Brick Buildings
When you are making rehabilitation decisions about your historic masonry house or building, follow these best practices:
- Preserve and maintain your original brick, stone, terra cotta, cast concrete, mortar and other masonry original to your building. Your masonry exterior is a character-defining feature, and its different textures, finishes and patterns contribute to your building’s appearance. Preserve your building’s masonry to retain your building’s historic character. Do not cover or conceal original masonry surfaces with non-historic materials such as metal, exterior insulated finishing systems or vinyl.
- Keep your historic masonry visible and unpainted. Do not paint or seal your masonry building if it has never been painted or sealed. Your brick’s color and texture is an important part of its appearance. Any paint you apply to your brick will require regular maintenance and periodic repainting. If you paint or seal your building, it may trap the moisture in the wall and cause your bricks to fail. It may also cause moisture-related issues on the interior, such as mold. Silicone-based sealants do not allow bricks to “breathe” and can trap moisture within walls. If water is penetrating your historic masonry building, you can use one of the highly effective non-paint relatedEnlargetreatments that are available to strengthen your damaged or sandblasted masonry and make it more water repellent and resistant to the elements.
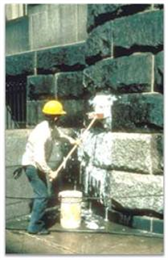
Depending on the type of dirt/pollution on a building - it is possible to clean the building using a brush and soapy water as seen in this photo. Source: WHS - State Historic Preservation Office.
- Use the gentlest means possible when cleaning your masonry. Clean your historic masonry only when necessary to halt deterioration or to remove graffiti and stains. Use water, a mild detergent and/or a non-harmful chemical solution and a bristle brush followed by a low-pressure water rinse. Low-pressure washing means 1,000 psi or less with the tip of the spray wand held no closer than 12 inches to the wall surface. Test a small area of your wall first to ensure the procedure and cleaning agent you are using are compatible with the masonry on your building.

CAUTION: Do not use harsh, abrasive cleaning methods, such as sandblasting, to clean or remove paint from your historic masonry building. Abrasive cleaning methods remove the exterior hard crust, expose the soft inner brick and allow water to penetrate. Abrasive cleaning of historic buildings is also a violation of state statutes.
- EnlargeDo not use power tools on your historic masonry. If you need to remove or repair mortar joints on your masonry building, use hand tools instead of power tools. Power tools can damage the brick and are not recommended for removing mortar. Hand tools allow for precision work and minimal damage to the adjacent brick and stone.
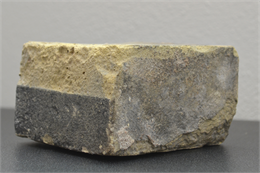
The top half of this brick was sandblasted. Note the sandblasting not only removed the hard outer layer (still evident on the lower half), it also damaged the inner, softer brick. Pock mocks are evidence of sandblasting. Source: Photographer Ginny Way.
- Use a mortar mix similar to the original mortar to repoint your masonry building. If you need to repoint your historic masonry house or building, use a mortar mix that is equal to or softer than your historic mortar. You can test the hardness of the mortar with a simple and relatively inexpensive test. If you notice mortar falling out or missing, hire a professional mason with experience in pointing historic buildings.
