Preventing Paint Failure on Your Historic Building
Before you paint the interior or exterior of your historic house or building, you must make adequate preparations to prevent your paint job from failing.
Your paint job would fail if it did not fulfill either of these two key purposes for paint:
- To protect the painted surface
- To add aesthetic appeal
Several common causes of paint failure — and the measures you can take to prevent them — are described below.
High Moisture Content
Paint cannot adhere to any surface with a moisture content above 15%. A wood surface with a high moisture content will cause paint failure from the moment the moist surface is painted. Before you apply any primer, paint or caulk, you should test the wood to be sure the moisture content does not exceed 15%. The only way you can determine the moisture content is with a moisture meter. You can purchase a moisture meter at woodworking supply stores and some lumber yards.
Pressure Washing

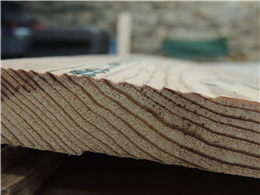
When paint is removed from wood siding using a very high pressure wash, the water essentially removes the softer lignin between the harder wood grain. The end result is a "washboard" effect. Source: Bob Yapp
A major cause of catastrophic paint failure on a wood surface is pressure washing. Pressure washers run between 1,800 to 3,200 pounds per square inch (psi). These pressures are similar to those used in sand blasting, which is prohibited on historic structures by Wisconsin State Statutes. This amount of water pressure drives a massive amount of moisture into the wood. Many older houses have board sheathing instead of modern plywood, so the pressure drives the water through the board joints into the wall cavity. The moisture in the wall cavity creates the conditions for future mold and mildew problems inside the house.
High-pressure washing puts so much moisture into the wood that it can take weeks and even months for the surface to dry out enough for paint. If the surface is painted when the moisture content is too high, the paint job won't fail in two or three years — it will fail immediately. The areas around the wet wood are the only places where the paint will hold at all. Pressure washing also damages the surface of the aged wood by making it “fuzzy,” which also impedes paint adhesion.
Although some painters think pressure washing will scrape and clean a house, field observations have demonstrated that hand cleaning with trisodium phosphate (TSP) and water after pressure washing produces lots of dirt that would have stayed in place while painting.
Finally, the Environmental Protection Agency (EPA) has essentially outlawed pressure washing. Pressure washing can spread lead paint chips everywhere. On a windy day, lead paint chips can be found blocks away after a structure is pressure washed. The EPA will allow pressure washing if the painter creates a dam around the entire house to contain the water that is full of lead, but this would be functionally impossible.
Poor Wood Condition
A wood surface in poor condition can cause paint failure. Here are two causes of poor wood condition:
- Decay. Wood that feels soft or has rotted will not hold paint. You will have to replace decayed wood before you can paint the area.
- Sun exposure. Bare wood that has been exposed to the sun for more than a week or two begins to get a silvery gray surface due to the ultraviolet light. The discoloration indicates the wood is dead and will not adequately hold paint. You should sand or scrape off the gray film before you paint it.
- Hard mill finish. Hard mill finished wood is run through a planer with dull knives. This process beats the wood surface so hard that it does not have enough porosity for paint to bond to the surface. You can run a wet sponge over these milled surfaces to open the pores. If you allow the wood to dry below 15% moisture content, it will hold paint well.
Insulation
Insulation that has been added to plaster exterior walls is one of the top causes of exterior paint failure, termites and structural damage to historic houses and buildings. Building codes require that when a new house or addition is built in Wisconsin, it must have a vapor barrier installed under the drywall. The vapor barrier prevents wet air from getting to the insulation and causing condensation. Warm, moist air is generated in houses and building by many activities: cooking, taking showers, having plants, even breathing. That warm, moist vapor enters the walls through hairline wall cracks, outlets, switches and window trim.
However, old houses and buildings with plaster walls have no vapor barrier under the plaster. A natural exchange of air is critical to the moisture health of all old buildings. If insulation is added, the wet air will reach the insulation and condensate. The moisture will wet down the loose fill, blown-in insulation, making a wet mass at the bottom of the wall cavity. This wet mass creates an inviting place for termites and dry rot. The moisture also enters the exterior sheathing and wood siding, causing permanent exterior paint failure. When this happens, many homeowners consider installing replacement siding over the original. This practice can actually make the problem worse. The combination of replacement siding and backer board (insulation board) over the original siding creates a vapor barrier on the outside of the wall. This vapor barrier stops the free exchange of air, trapping more moisture.
Dense pack cellulose and foam insulation are also solid masses that impede air flow. When exterior and interior moisture enter the wall cavity, the wall will never dry out. Mechanical air exchangers are not an adequate solution, because they do a poor job of exchanging fresh and stale air in old houses and buildings. The electric motor can fail without the owner even knowing.
Inadequate Surface Preparation

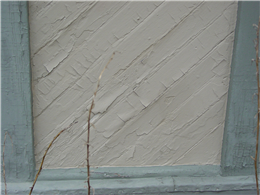
Walworth County. This type of paint failure occurs when there are too many layers of paint - sometimes called "alligatoring". Source: WHS - State Historic Preservation Office.

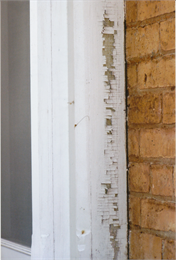
Here you can see the loose paint was not removed prior to repainting. In this case, the new paint will fail quickly. Source: Bob Yapp
Before you paint any surface, you must adequately prepare the surface for paint to prevent paint failure. Here are several surface conditions that could cause paint failure if you do not address them:
- Dirt. Applying paint to a dirty exterior surface is a prescription for paint failure. Hand cleaning is the only effective way to clean an old dirty paint surface. You should completely paint the surface as quickly as possible after cleaning it. In just days, a well-cleaned and prepared surface can have enough airborne particulates attach to the surface to reduce the longevity of the paint job by years.
- Painting over loose paint. The process of preparing a surface for paint by scraping and other means tends to leave loose paint on the surface. The loose paint can cause the new paint to fail.
- Incompatible paint layers. A wood surface that has many coats of paint will cure at different rates. Oil- and lead-based paints never actually stop curing, while latex/acrylic-based paints cure quickly and completely. A new latex top coat contracts and expands at a different rate than the old paint under it, which in turn causes the old paint to pull away from the wood. if the surface you want to paint has more than three complete paint jobs (nine layers),you should remove all the paint down to the bare wood. If you must remove lead paint, follow the procedures for lead safe removal.
- Inadequate or improper caulking. Many homeowners try to seal the exteriors of their houses too tightly. You should caulk everywhere that cascading water can enter your house, but never where it cannot. For example, you should not caulk underneath all your clapboards or wood shingle siding, because cascading water cannot enter the joints in these types of siding. However, cascading water can enter the joint where a piece of window casing trim rests on top of a window sill, so this is a joint you should caulk.
The information presented here is not intended to provide comprehensive technical advice or instructions on solving historic preservation issues. Any information contained or referenced is meant to provide a basic understanding of historic preservation practices. Read full disclaimer.
