Common Problems with Exterior Wood Trim on Your Historic Building
The exterior wood trim on your historic house or building is an important character-defining feature of your structure’s architectural style. You’ll need to make good repair decisions to retain the historic appearance of your wood trim. Before you make repair decisions, you should determine what type and style of wood trim is installed on your historic house or building. Many repair issues are common to all types of wood trim, but you may encounter some issues unique to the type of trim on your house or building.
The exterior wood trim on your historic house or building could include any of the types and styles described below.
Casings

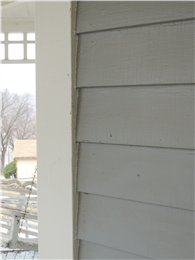
Clapboard butted to flat 1.25 inch corner casing trim is a common detail of historic houses. Source: Bob Yapp
Exterior wood casings are generally flat, unmolded trim that surrounds windows, doors, outside corners, inside corners and separations between different siding materials. They were designed to visually frame any given area and to act as the termination point for different siding materials. The width of wood casings varies, but almost all casing trim is 5/4 (1-1/4) inches thick. Early houses were trimmed with true 5/4 -inch casings, while later houses (after 1900) used 5/4 inch lumber with nominal lumber sizes ranging from 1-3/16 to 1-1/6 inches.
Casings are made from several different woods, including pine, fir, cedar and occasionally cypress. Pine was the most commonly used wood casing material before 1950. Casings installed before 1900 usually had the nails set below the surface and filled with glazing compound.
Drip Cap Moldings

A drip cap with a steep angle installed over a window is an important detail to retain as it directs water away from the wall. Source: Bob Yapp
Exterior drip cap moldings are used on top of window and door casings and as horizontal banding. They were designed to act as small roofs to prevent rain from entering behind the casings. Drip caps often have metal flashing on the top surface to prevent water from soaking into the wood. Most drip caps also have a small saw kerf running along their length on the underside. The saw kerf stops dripping water from running to the casing and directs the water away.
Drip cap moldings are made from several different types of wood, including pine (the most common), fir, cedar and occasionally cypress.
Decorative Moldings
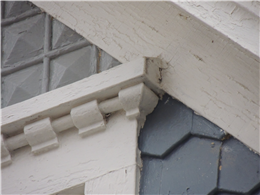
Exterior decorative wood moldings include crown, roman ogee, beaded and elaborate custom-made moldings. Decorative moldings are made from several different woods including pine (the most common), fir, cedar and occasionally cypress. The type of molding installed on your historic house or building will depend on the age and style of your structure. After the Civil War, most wood moldings were made in a millwork shop. Molding planers could manufacture tens of thousands of lineal feet of decorative moldings. Moldings installed before 1900 usually had the nails set below the surface and filled with glazing compound.
Brick houses have brick moldings around their windows and doors. Brick moldings are actually constructed of wood and separate the wood windows and doors from the brick siding. Most brick moldings are 1-3/4 inches thick and often have a beaded edge or a decorative molded edge.
Common Exterior Wood Trim Problems and Solutions
Click the link on each subject to learn how to solve the problem.
| Common Problem | Learn More |
Horizontal cracks or splits along the grain lines. | For repair instructions, click here. |
Severe weathering of the softer spring and summer wood. | This leaves the harder winter growth grain higher on the surface. For information on painting this damage, click here. |
A washboard effect on the wood caused by sandblasting or high-pressure power washing. | This wood will almost always need to be replaced. |
Severe cupping of the trim boards. | These pieces will generally need to be replaced. For replacement instructions, click here. |
Water penetrating under the moldings and settling at the bottom edge of the moldings, causing wood rot. | To eliminate most of the water penetration, apply caulk at the top of the trim. For more information, click here. |
Failed metal flashings on drip cap moldings. | These flashings will need to be replaced. For replacement instructions, click here. |
Rot around the nails. | Steel nails rust over time, and if your trim was face nailed, water can penetrate and cause rot and nail deterioration. Trim installed before 1900 usually had the nails set below the surface and filled with glazing compound. This method preserved the materials better than surface face nailing with a headed box nail. For repair information, click here. |
